
here is a look at what's ahead...
- how to create an inspiration and color board
- using photoshop actions
- adding graphics to images
materials needed for this course include photoshop, access to the internet (i will provide links that have been the most successful for me), and some creativity! let's get started...

creating an inspiration board is a great way to engage your readers with beautiful photos that you have either taken yourself, or one's that inspire you from elsewhere. there are several sites available to you on the web that provide breathtaking photos that can easily be incorporated into your next inspiration board.
some of my favorites include pinterest, we heart it, deviant art (i will be referencing this site often, one because it is fabulous, two because everything is free!) and of course google images. when using photos from these or other sources, remember to leave a photo credit citing back to the original creator!
creating an inspiration board on photoshop is very easy...here is a highlight of the creative process.

to start you will want to pick a theme that means something to you and use images that relate to this theme. an inspiration board can consist of as many images as you would like. once you pinpoint the photos and or graphics you would like to include open all of them up in photoshop and create a new file specifying whatever size you would like. this is where all of your photos will be placed to create your collage board.

when choosing a size for your inspiration board, typically selecting a size that will fill your entire post area looks best. doing this will allow for the images to be as large as possible and will be more visually appealing for your readers.

images found on pinterest
above i have created an inspiration "photo board." i picked a theme of bohemian girl because i am really moved by the artistic styling and i wanted my board to represent just that. after opening all of my images in photoshop and creating a blank file - i used dimensions 450 pixels by 1500 pixels to start - i began dragging the photos over into the blank file to create my board.
i refer to this inspiration photo board as a clean collage because of the even spaces between each photo. you can create one like this as well or you can make it like a true collage and overlap the photos on top of one another. it depends on the look that you are trying to achieve.
in the above example i started with a larger image on the top and worked my way down from there making each piece fit like a puzzle. to create the even spaces you may need to crop your images so that they align with one another either vertically or horizontally. if after you have added all of your photos to your board and you have extra empty space at the bottom, simply crop the full image eliminating this extra space.
inspiration boards, although easy to create can be time consuming. a computer or system crash could happen at any moment so be sure to save your work often ( i know...you've heard this so many times before)!

color inspiration boards are my favorite type of boards to create. while my first example was inspired by the bohemian girl style, this board is simply inspired by color.
i decided a retro theme would be fun and picked colors that i thought fit well into this category. typically a 3-4 color spread gives you enough variety. once you have pinpointed the colors that you want to use, follow the same exact guidelines for creating your inspiration board as we used in the previous example.
when using photoshop to create a color inspiration board use your color picker to pinpoint colors within the photos that interest you most to help you develop your color palette. refer to the screenshot below...

...in this example i "color picked" the pink icing on the cake. photoshop then recognizes this color and i am now able to add it to my color pallete.

using photo actions in photoshop has quickly become one of my favorite things to do. one, because it is as easy as a click of a button and two, it really can change the mood of a picture. if you have photoshop and have not yet experimented with photo actions i highly recommend it.
below is an example of several different photo actions using the same photo for each...

as you can see, you can use the same photo but get a completely different look and feel depending on which photo action you choose. if you are looking for a place to find a variety of photo actions i highly recommend looking on deviant art - this link will take you directly to the photo action search results.
for those of you that are new to photo actions, to get started you will need to follow these steps
- locate the photo action you are most interested in and download
- once the download is complete you will need to open up photoshop
- go to your actions palette (located next to the history tab) on the left side of your screen and select the small arrow to open the drop down menu > select "load actions" then locate your photo action download on your desktop and select load. refer to screen shots below

- now you are ready to start using your newly downloaded photo action. open the photo for which you want to apply the photo action. in the actions palette select the "play" button.

allow the photo action to run through entirely

and your photo is now complete! using photo actions in this way allows you to complete anywhere from 10-50 steps with just one click of the button. you'll love this design and photo editing technique!

adding graphics to images is a fun and unique way to keep your photos interesting. adding text to an image (for example the image just above) is an easy way to get started, but photoshop brushes are among my favorite design elements to add to an image.
again, i highly recommend deviant art as a resource to locate a variety of photoshop brushes. you can create a search for any type of brush...hearts, feathers, retro shapes etc. the possibility's are truly endless. the best part is they are all free
**be sure to read any copyright information for personal and commercial use**

in this example i incorporated a feather photoshop brush at the top of the image. there was open space available so i thought incorporating this design would add some interest and texture. you can customize all button colors using the color picker that i referenced previously. your options are endless!
downloading and using photoshop brushes is very easy. follow these simple steps
- locate a photoshop brush you are most interested in and download
- open your photoshop brush pallette, click on the arrow and select from the drop down menu "load brushes"

- locate the photoshop brush download on your desktop and select "load"

the brush is now ready to be applied to any photo you would like! first, open your photo in photoshop, select a color with the color picker that you would like to use, and select the brush from your brush library apply to your photo.
simply hover over your image with the photoshop brush and click...it is now made part of your photo!

some of you may be wondering...what the heck is a .png file. basically, a png file is a graphic that is most times in full color and has no background. meaning it is VERY easy to add these types of graphics to your photos with out having that awful stark white box getting in the way.
you can locate .png files easily on deviant art (can you tell i like this site yet?) once you find what you like, simply download the file.
now let's apply a .png graphic to a picture. open a photo and the .png file you would like to merge together. your ..png file should look something like this...
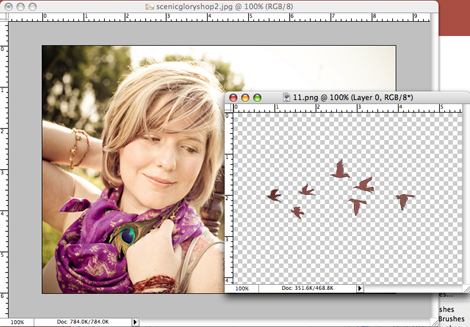
all you need to do now is drag the .png graphic and position onto your photo. in this example i am using a picture that has some sky space and incorporating these pretty flying birds. the end product looks like this...

i hope you enjoyed my little tid bits of creative advice and would love for you to stop by and visit my little corner of the blogging world - scenic glory - let your spirit take flight
No comments :
Post a Comment